Well, I'm using Outlook 2013 for e-mail client as you can seamlessly use multiple accounts at once.
Work account, personal account, business account, all in one....
Yesterday, I bought the Google Apps package with e-mail as well as custom domain to jump start my side business. But then, when I try to add the account to Outlook 2013, it failed.
Here are the ways on how to do this, not that complex, but it involve a few steps.
First, choose the manual set-up.
Then, choose POP or IMAP set-up.
Enter your details as per below.
For those using Google Apps with custom domain (I bought mine from Google), here are somethings to note:
- Your Name would be your display name
- E-mail address would be the custom e-mail address chosen, for example test@yourdomain.com
- Account type would be IMAP
- Incoming mail server would be imap.gmail.com (not imap.yourdomain.com)
- Outgoing mail server would be smtp.gmail.com (not smtp.yourdomain.com)
- User name would be the same as your e-mail (test@yourdomain.com), do not put a single username without @yourdomain.com
- Password would be your account password
Click on More Settings button.
Navigate to Outgoing Server tab, and follow the settings above. Do not choose use same settings as my incoming mail server as this would not allow your e-mail to be sent out.
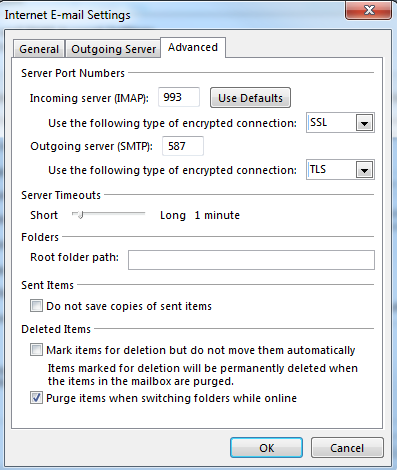
Next, click on the Advanced tab.
Make sure your settings are as above for the server port numbers.
Click OK, let the test run, if passed, then your account is ready to be used by Outlook 2013.
Cheers!


