Wednesday, 20 January 2016

SSH From Windows Command Prompt

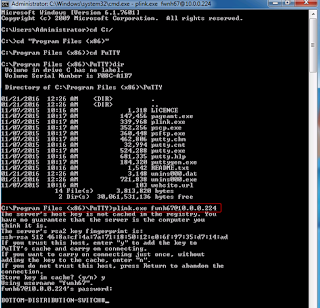
The title says it all. I had this question from one of my buddies earlier today. First, you'll need PuTTY installed in the Windows machine.

If we navigate to PuTTY directory, we are able to see there is a piece of executable called plink.exe. This would enable you to SSH directly to any devices (of course the ones that support SSH) from Windows command prompt.


The executable is invoked for SSH to target devices using the below syntax example:


Hope this helps for command line peoples out there!


Friday, 1 January 2016

Getting Notepad++ Installed In Your Linux Distribution

When dealing with scripts, you'll need a better text editor to work on the fly. I've been using Windows previously, and Notepad++ is a good text editor to get me going around scripts. Moving recently to Linux, you can't get Notepad++, but you may use Notepadqq as an alternative.

Here are the steps to install this piece of text editor. First, add the required repo to get the installer:

root@ubuntu:/home/fwnh67# add-apt-repository ppa:notepadqq-team/notepadqq
 Notepadqq text editor
 More info: https://launchpad.net/~notepadqq-team/+archive/ubuntu/notepadqq
Press [ENTER] to continue or ctrl-c to cancel adding it

gpg: keyring `/tmp/tmpgrega6w7/secring.gpg' created
gpg: keyring `/tmp/tmpgrega6w7/pubring.gpg' created
gpg: requesting key 63DE9CD4 from hkp server keyserver.ubuntu.com
gpg: /tmp/tmpgrega6w7/trustdb.gpg: trustdb created
gpg: key 63DE9CD4: public key "Launchpad PPA for Notepadqq Team" imported
gpg: Total number processed: 1
gpg:               imported: 1  (RSA: 1)
OK

Once the repo has been added, update the repo lists.

root@ubuntu:/home/fwnh67# apt-get update

After that, fetch the installer and installed the software.

root@ubuntu:/home/fwnh67# apt-get install notepadqq
Reading package lists... Done
Building dependency tree      
Reading state information... Done
The following extra packages will be installed:
  notepadqq-common
The following NEW packages will be installed:
  notepadqq notepadqq-common
0 upgraded, 2 newly installed, 0 to remove and 239 not upgraded.
Need to get 950 kB of archives.
After this operation, 5,446 kB of additional disk space will be used.
Do you want to continue? [Y/n] y
Get:1 http://ppa.launchpad.net/notepadqq-team/notepadqq/ubuntu/ trusty/main notepadqq-common all 0.50.6-0~trusty1 [695 kB]
Get:2 http://ppa.launchpad.net/notepadqq-team/notepadqq/ubuntu/ trusty/main notepadqq amd64 0.50.6-0~trusty1 [255 kB]
Fetched 950 kB in 6s (136 kB/s)                                               
Selecting previously unselected package notepadqq-common.
(Reading database ... 166254 files and directories currently installed.)
Preparing to unpack .../notepadqq-common_0.50.6-0~trusty1_all.deb ...
Unpacking notepadqq-common (0.50.6-0~trusty1) ...
Selecting previously unselected package notepadqq.
Preparing to unpack .../notepadqq_0.50.6-0~trusty1_amd64.deb ...
Unpacking notepadqq (0.50.6-0~trusty1) ...
Processing triggers for hicolor-icon-theme (0.13-1) ...
Processing triggers for man-db (2.6.7.1-1ubuntu1) ...
Processing triggers for gnome-menus (3.10.1-0ubuntu2) ...
Processing triggers for desktop-file-utils (0.22-1ubuntu1) ...
Processing triggers for bamfdaemon (0.5.1+14.04.20140409-0ubuntu1) ...
Rebuilding /usr/share/applications/bamf-2.index...
Processing triggers for mime-support (3.54ubuntu1.1) ...
Setting up notepadqq-common (0.50.6-0~trusty1) ...
Setting up notepadqq (0.50.6-0~trusty1) ...
update-alternatives: using /usr/lib/notepadqq/notepadqq.sh to provide /usr/bin/notepadqq (notepadqq) in auto mode

And you're done!

Saturday, 19 December 2015

Installing GIT On CentOS5

A simple sharing today, seems that installing git on CentOS5 (I am using CentOS 5.8 for some testing) requires different steps rather than the Ubuntu distribution I used previously.

First, you got to install some git dependencies:

[root@localhost ~]# yum -y install zlib-devel openssl-devel cpio expat-devel gettext-devel
Loaded plugins: fastestmirror, security
Loading mirror speeds from cached hostfile
 * base: mirror.hmc.edu
 * extras: mirror.compevo.com
 * updates: mirror.hmc.edu
Setting up Install Process
Package cpio-2.6-26.el5.x86_64 already installed and latest version
Resolving Dependencies
--> Running transaction check
---> Package expat-devel.i386 0:1.95.8-11.el5_8 set to be updated
---> Package expat-devel.x86_64 0:1.95.8-11.el5_8 set to be updated
---> Package gettext-devel.i386 0:0.17-1.el5 set to be updated
---> Package gettext-devel.x86_64 0:0.17-1.el5 set to be updated
---> Package openssl-devel.i386 0:0.9.8e-37.el5_11 set to be updated
--> Processing Dependency: krb5-devel for package: openssl-devel
---> Package openssl-devel.x86_64 0:0.9.8e-37.el5_11 set to be updated
---> Package zlib-devel.i386 0:1.2.3-7.el5 set to be updated
---> Package zlib-devel.x86_64 0:1.2.3-7.el5 set to be updated
--> Running transaction check
---> Package krb5-devel.x86_64 0:1.6.1-80.el5_11 set to be updated
--> Processing Dependency: libselinux-devel for package: krb5-devel
--> Processing Dependency: e2fsprogs-devel for package: krb5-devel
--> Processing Dependency: keyutils-libs-devel for package: krb5-devel
--> Running transaction check
---> Package e2fsprogs-devel.x86_64 0:1.39-37.el5 set to be updated
---> Package keyutils-libs-devel.x86_64 0:1.2-1.el5 set to be updated
---> Package libselinux-devel.x86_64 0:1.33.4-5.7.el5 set to be updated
--> Processing Dependency: libsepol-devel >= 1.15.2-1 for package: libselinux-devel
--> Running transaction check
---> Package libsepol-devel.x86_64 0:1.15.2-3.el5 set to be updated
--> Finished Dependency Resolution

Dependencies Resolved

================================================================================
 Package                  Arch        Version                Repository    Size
================================================================================
Installing:
 expat-devel              i386        1.95.8-11.el5_8        base         132 k
 expat-devel              x86_64      1.95.8-11.el5_8        base         129 k
 gettext-devel            i386        0.17-1.el5             base         364 k
 gettext-devel            x86_64      0.17-1.el5             base         380 k
 openssl-devel            i386        0.9.8e-37.el5_11       updates      1.9 M
 openssl-devel            x86_64      0.9.8e-37.el5_11       updates      1.9 M
 zlib-devel               i386        1.2.3-7.el5            base         102 k
 zlib-devel               x86_64      1.2.3-7.el5            base         103 k
Installing for dependencies:
 e2fsprogs-devel          x86_64      1.39-37.el5            base         639 k
 keyutils-libs-devel      x86_64      1.2-1.el5              base          27 k
 krb5-devel               x86_64      1.6.1-80.el5_11        updates      1.9 M
 libselinux-devel         x86_64      1.33.4-5.7.el5         base         149 k
 libsepol-devel           x86_64      1.15.2-3.el5           base         192 k

Transaction Summary
================================================================================
Install      13 Package(s)
Upgrade       0 Package(s)

Total download size: 7.8 M
Downloading Packages:
(1/13): keyutils-libs-devel-1.2-1.el5.x86_64.rpm         |  27 kB     00:00    
(2/13): zlib-devel-1.2.3-7.el5.i386.rpm                  | 102 kB     00:00    
(3/13): zlib-devel-1.2.3-7.el5.x86_64.rpm                | 103 kB     00:00    
(4/13): expat-devel-1.95.8-11.el5_8.x86_64.rpm           | 129 kB     00:00    
(5/13): expat-devel-1.95.8-11.el5_8.i386.rpm             | 132 kB     00:00    
(6/13): libselinux-devel-1.33.4-5.7.el5.x86_64.rpm       | 149 kB     00:00    
(7/13): libsepol-devel-1.15.2-3.el5.x86_64.rpm           | 192 kB     00:00    
(8/13): gettext-devel-0.17-1.el5.i386.rpm                | 364 kB     00:01    
(9/13): gettext-devel-0.17-1.el5.x86_64.rpm              | 380 kB     00:01    
(10/13): e2fsprogs-devel-1.39-37.el5.x86_64.rpm          | 639 kB     00:02    
(11/13): openssl-devel-0.9.8e-37.el5_11.x86_64.rpm       | 1.9 MB     00:06    
(12/13): krb5-devel-1.6.1-80.el5_11.x86_64.rpm           | 1.9 MB     00:06    
(13/13): openssl-devel-0.9.8e-37.el5_11.i386.rpm         | 1.9 MB     00:06    
--------------------------------------------------------------------------------
Total                                           240 kB/s | 7.8 MB     00:33    
Running rpm_check_debug
Running Transaction Test
Finished Transaction Test
Transaction Test Succeeded
Running Transaction
  Installing     : gettext-devel                                           1/13
  Installing     : zlib-devel                                              2/13
  Installing     : e2fsprogs-devel                                         3/13
  Installing     : keyutils-libs-devel                                     4/13
  Installing     : libsepol-devel                                          5/13
  Installing     : libselinux-devel                                        6/13
  Installing     : krb5-devel                                              7/13
  Installing     : expat-devel                                             8/13
  Installing     : expat-devel                                             9/13
  Installing     : openssl-devel                                          10/13
  Installing     : gettext-devel                                          11/13
  Installing     : zlib-devel                                             12/13
  Installing     : openssl-devel                                          13/13

Installed:
  expat-devel.i386 0:1.95.8-11.el5_8    expat-devel.x86_64 0:1.95.8-11.el5_8  
  gettext-devel.i386 0:0.17-1.el5       gettext-devel.x86_64 0:0.17-1.el5     
  openssl-devel.i386 0:0.9.8e-37.el5_11 openssl-devel.x86_64 0:0.9.8e-37.el5_11
  zlib-devel.i386 0:1.2.3-7.el5         zlib-devel.x86_64 0:1.2.3-7.el5       

Dependency Installed:
  e2fsprogs-devel.x86_64 0:1.39-37.el5 keyutils-libs-devel.x86_64 0:1.2-1.el5 
  krb5-devel.x86_64 0:1.6.1-80.el5_11  libselinux-devel.x86_64 0:1.33.4-5.7.el5
  libsepol-devel.x86_64 0:1.15.2-3.el5

Complete!

Next, we need to change the directory to source directory:

[root@localhost ~]# cd /usr/local/src

And then proceed to download git.

[root@localhost ~]# wget https://git-core.googlecode.com/files/git-1.9.0.tar.gz

After the download is done, extract the tar package.

[root@localhost ~]# tar xvzf git-1.9.0.tar.gz

Change the working directory to:

[root@localhost src]# cd git-1.9.0

Once done, invoke the below commands one by one (always wait for each to finish the tasks first):

[root@localhost ~]# ./configure
[root@localhost ~]# make
[root@localhost ~]# make install

And you're done! :O)

Friday, 18 December 2015

Getting Speedtest Into Your CLI

Previously, I performed Internet bandwidth and speedtest using GUI, browser and etc. However, since some of us might love terminals more (yes...it is indeed faster!), I'm going to share on how can we install speedtest script to our host OS.

The distribution that I used in this post would be:

root@ubuntu:/home/fwnh67# lsb_release -a
No LSB modules are available.
Distributor ID:    Ubuntu
Description:    Ubuntu 14.04.3 LTS
Release:    14.04
Codename:    trusty

Ah, before I forget, you got to elevate the terminal privilege to root before installing the speedtest-cli script.

Moving on, we invoke the below command to get the script installed:

root@ubuntu:/home/fwnh67# pip install speedtest-cli
Downloading/unpacking speedtest-cli
Downloading speedtest_cli-0.3.4-py2.py3-none-any.whl
Installing collected packages: speedtest-cli
Successfully installed speedtest-cli
Cleaning up...

Once done, you may return back to your original user privilege.

From the terminal, get speedtest to run and get your internet speed tested. Example as per below:

fwnh67@ubuntu:~$ speedtest
Retrieving speedtest.net configuration...
Retrieving speedtest.net server list...
Testing from TiME (1.1.36.4)...
Selecting best server based on latency...
Hosted by GSpeed Networks [121.65 km]: 14.065 ms
Testing download speed........................................
Download: 4.93 Mbit/s
Testing upload speed..................................................
Upload: 1.56 Mbit/s

Wednesday, 9 September 2015

Your Credentials Did Not Work!

Well, a classic solution to a classic problem.


Click on Start button, and search for gpedit.msc. Open.


In Computer Configuration, expand Administrative Templates.

Expand System.

Expand Credentials Delegation.


Double click Allow Delegating Saved Credentials and enable this.


Under add servers, I'm placing a wildcard just to allow every servers that I wanted the password remembered.


Click OK and then Apply.

Repeat the same with Allow Delegating Saved Credentials with NTLM-only Server!


Friday, 28 August 2015

Installing Firefox In Kali Linux

Ok, the next problem that I am facing right now is with the absence of a web browser for some surfing.

Here are the steps to download and install Firefox in your Kali Linux box:

Use the wget command to fetch the tar file from Firefox official site. Example:

xox@XOX-KLINUX:~$ wget https://download-installer.cdn.mozilla.net/pub/firefox/releases/40.0.3/linux-x86_64/en-US/firefox-40.0.3.tar.bz2
--2015-08-29 02:28:50--  https://download-installer.cdn.mozilla.net/pub/firefox/releases/40.0.3/linux-x86_64/en-US/firefox-40.0.3.tar.bz2
Resolving download-installer.cdn.mozilla.net (download-installer.cdn.mozilla.net)... 117.18.232.191
Connecting to download-installer.cdn.mozilla.net (download-installer.cdn.mozilla.net)|117.18.232.191|:443... connected.
HTTP request sent, awaiting response... 200 OK
Length: 48265357 (46M) [application/x-bzip2]
Saving to: ‘firefox-40.0.3.tar.bz2’

firefox-40.0.3.tar.bz2                               100%[=======================================================================================================================>]  46.03M  3.50MB/s   in 13s  

2015-08-29 02:29:04 (3.42 MB/s) - ‘firefox-40.0.3.tar.bz2’ saved [48265357/48265357]

Unzip the tar file into the /usr/local directory, make sure you run this as root!:

root@XOX-KLINUX:/home/xox# ls
Desktop  Documents  Downloads  firefox-40.0.3.tar.bz2  Music  Pictures  Public  Templates  Videos
root@XOX-KLINUX:/home/xox# cd /usr/local
root@XOX-KLINUX:/usr/local# tar xjf /home/xox/firefox-40.0.3.tar.bz2
root@XOX-KLINUX:/usr/local# ls
bin  etc  firefox  games  include  lib  man  sbin  share  src

And you're done!

Adding Users In Kali Linux

For my work purpose, I need to use Kali Linux now. Been experimenting with it a little bit, I applied my experience to add user within the OS but it seems not to go through at all.

Had quite a hard time and around half an hour spent thinking on the solution, here are the steps for the unfortunate :P

First, by default, you should be logging into Kali Linux as a root user. I am using Kali with the below version output:

root@XOX-LINUX:~# uname -a
Linux XOX-LINUX 4.0.0-kali1-amd64 #1 SMP Debian 4.0.4-1+kali2 (2015-06-03) x86_64 GNU/Linux

root@XOX-LINUX:~# lsb_release -a
No LSB modules are available.
Distributor ID: Kali
Description: Kali GNU/Linux 2.0
Release: 2.0
Codename: sana

And here are the steps for new user creation:

root@XOX-LINUX:~# adduser xoxuser
Adding user `xoxuser' ...
Adding new group `xoxuser' (1001) ...
Adding new user `xoxuser' (1000) with group `xoxuser' ...
Creating home directory `/home/xoxuser' ...
Copying files from `/etc/skel' ...
Enter new UNIX password:
Retype new UNIX password:
passwd: password updated successfully
Changing the user information for xoxuser
Enter the new value, or press ENTER for the default
Full Name []: Bob Nuxi
Room Number []:
Work Phone []:
Home Phone []:
Other []:
Is the information correct? [Y/n] y

Verification of new user:

root@XOX-LINUX:/etc# cat passwd | grep xoxuser
xoxuser:x:1000:1001:Bob Nuxi,,,:/home/xoxuser:/bin/bash

I'll edit this posting if any future changes are seen, but for now, hope it helps!