Thursday 6 November 2014

How To Add Your E-Mail Address To Outlook 2013 When You're Using Google Apps Mail

Bet the title says it all.

Well, I'm using Outlook 2013 for e-mail client as you can seamlessly use multiple accounts at once.

Work account, personal account, business account, all in one....

Yesterday, I bought the Google Apps package with e-mail as well as custom domain to jump start my side business. But then, when I try to add the account to Outlook 2013, it failed.

Here are the ways on how to do this, not that complex, but it involve a few steps.

First, choose the manual set-up.


Then, choose POP or IMAP set-up.


Enter your details as per below.


For those using Google Apps with custom domain (I bought mine from Google), here are somethings to note:

  • Your Name would be your display name
  • E-mail address would be the custom e-mail address chosen, for example test@yourdomain.com
  • Account type would be IMAP
  • Incoming mail server would be imap.gmail.com (not imap.yourdomain.com)
  • Outgoing mail server would be smtp.gmail.com (not smtp.yourdomain.com)
  • User name would be the same as your e-mail (test@yourdomain.com), do not put a single username without @yourdomain.com
  • Password would be your account password

Click on More Settings button.


Navigate to Outgoing Server tab, and follow the settings above. Do not choose use same settings as my incoming mail server as this would not allow your e-mail to be sent out.

Next, click on the Advanced tab.


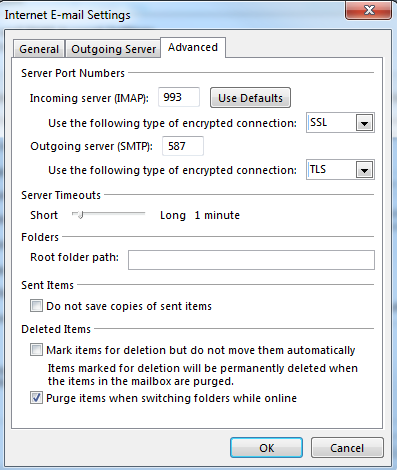
Make sure your settings are as above for the server port numbers.

Click OK, let the test run, if passed, then your account is ready to be used by Outlook 2013.

Cheers!


Sunday 19 October 2014

Poor Graphic Performance GNOME On CentOS 7 With VMWare Workstation 10

A new issue.

Seems that my CentOS GNOME desktop is pretty slow and lagging.

Alright, for those who encounters the same issue, check you VM display settings.

First, power off your CentOS VM.

Navigate to Edit virtual machine settings:


Then, under the Hardware tab, choose Display. In 3D graphics section, tick the checkbox for Accelerate 3D graphics.


The GNOME graphic should improve once you boot your VM back.

No Network Adapter When Installing CentOS In VMWare Workstation 10

Earlier today I tried to get CentOS to run in my VMWare Workstation. Installation goes smooth, and finally is up and running.

Browse around a little bit, tried to update the packages, however failed.

Duh, no network adapter. Awesome. I thought I've made a mistake in configuring the VM networking settings.

Hmm, it is set to bridge, looks normal, what could go wrong? My other VMs are working fine.

Tried to run ifconfig -a, no network adapter listed. Alright, probably this is somehow caused by new kernel, I added the interface manually.

Still doesn't work.

Aargh, this is pretty frustrating. Time for some troubleshooting.

What I did was, prepare two VMs, both are installing from the image file.

One VM was set to Other Linux 3.x kernel 64-bit, the other was set to CentOS.

Yay! I saw my network adapter is detected in the Other Linux 3.x kernel 64 bit. But no luck with the CentOS selection.

So, what's the difference? Well, I pulled up the .vmx file within the Notepad++, and check for any differences.


The Other Linux 3.x kernel 64-bit has this coded into the .vmx:

ethernet0.virtualDev = "e1000"

The setting is still bridged.

The CentOS setting has this coded into the .vmx:

ethernet0.connectionType = "bridged"

Hmm, I saw a solution. If anyone do encounter this issue, install CentOS in your VMWare Workstation using the Other Linux 3.x kernel 64-bit.

Friday 17 October 2014

Calling The YaST Module 'Inst_Autoinit Has Failed

Earlier today I was just trying to install OpenSuse to my VMWare Workstation 10.

And guess what, I was presented with the below screen:


Hmm, it says calling the YaST module 'inst_autoinit has failed.

For those who are unsure what YaST is, it stands for Yet Another System Tool.

As I suspected, within my VM workstation, mounting the original ISO image seemed to create another CD/DVD drive, with the autoinst mounted. There is another autoinst.flp file being mounted in the floppy drive.


To resolve this, power off your VM first.

Remove the CD/DVD drive using the autoinst.iso, as well as the floppy drive having autoinst.flp mounted.

Leave the original installation ISO image mounted. Do not remove it.

Compare the screenshot below with the above if you are having any problems in removing the said CD/DVD and floppy drive.


Click OK, and power on the VM again. You should get to the correct installation page. Choose Installation.

Specify the boot options as below:

insecure=1


Now, you should be able to install OpenSUSE 13.1 normally.

Thanks!